 Websockets/Redis Setup in AWS Elastic Beanstalk
For context please read our post on How to Create Scalable Real-Time Applications in AWS first.
This document will serve as instructions for setting up your auto-scaling Elastic Beanstalk environment to use websockets with Express, Socket.IO and Redis. If you are using something other than Socket.IO for your websocket implementation, you’ll still need to follow these steps to get your environment set up.
Please note: This is the simplest set up that you can have. This will be using the bare minimum for Elasticache, Elastic Beanstalk, and websocket implementation. It is meant to be a foundation that you can build upon, not a production ready service.
Create Elastic Beanstalk Environment
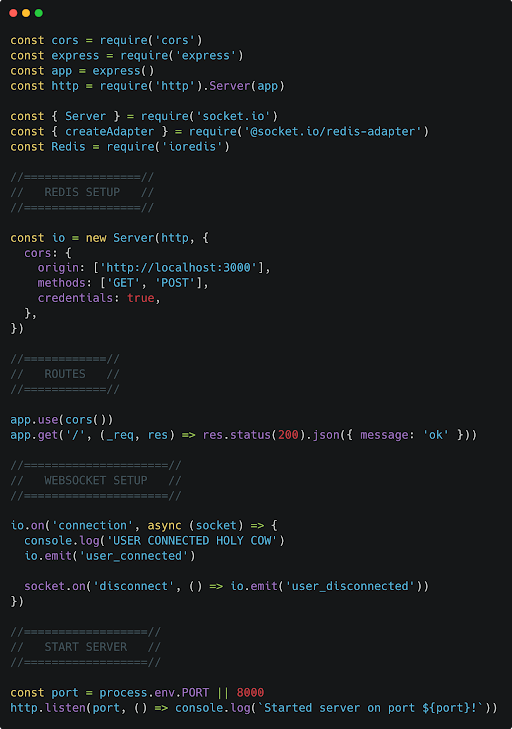
Before we create our Elastic Beanstalk environment, write a basic version of your server with a simple implementation of websockets. For example, here’s what a bare-bones Node server would look like.
Now that you have your server written up, you’ll also need to create a few other files to ensure that your environment is set up correctly.
We’ve only been able to make the following work by having these configs set up when creating the environment. We were unable to change these settings later and actually have them applied.
That being said, other users seem to have had success using a .platform directory to issue an nginx restart command to apply settings post-creation.
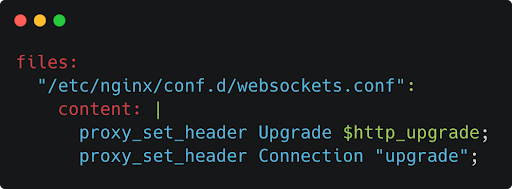
.ebextensions/websocket.config
Procfile
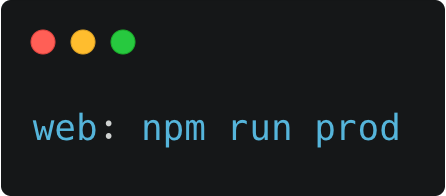
(In the Procfile, make sure the command after “web:” is whatever command you want the server to use to run your server in production)
Once you have all of the necessary files created in your project, compress them into a zip file. Then follow these steps to deploy your code.
- Log into your AWS Management Console
- Go to the Elastic Beanstalk Console
- Click on Environments in the navigation menu on the left side of the page
- Click the Create a new environment button on the table that appears
- Choose a web server environment and click Select
- Give your application a name, the environment name will automatically be populated
- Choose whatever platform your server should be deployed on
- For Application Code, select Upload your code and then supply the zip file of your project
- Click the Configure more options button if you would like to access advanced settings about the project
- When finished, click the Create environment button. This will take around 5-10 minutes to deploy your new server
Create Redis Instance with Amazon Elasticache
If your service has no need for auto-scaling or multiple servers, and it can be a single node, then you can skip this step.
Websockets work by establishing and maintaining a connection with a given server on the backend, allowing duplex communication between the client and server. In a horizontally scaled environment, or one with multiple servers, this becomes a complicated problem. What if two clients that need to share events are connected to two different servers? How does one server know what happened on the other server and communicate it to their client?
This is where Redis comes in. Redis is an in-memory data structure store, but more importantly it provides us a mechanism for implementing a publish-subscribe pattern. Using this, all of our servers can publish and subscribe to events from Redis, and then all of the servers will receive the same events and can react accordingly.
1. Create a Security Group for your cache
To set up a Redis cache in AWS, we’ll use a service called Amazon ElastiCache. Before we can do that though, we need to create a Security Group that we’ll apply to the cache when we create it.
- Go to the EC2 Dashboard
- Select Security Groups from the Resources table in the dashboard or from the navigation menu on the left side of the page
- Click the Create security group button on the table that appears
- Give it a name related to your cache
- Add an Inbound Rule like the following. In the search bar, look for the security group containing your Elastic Beanstalk EC2 instances. This will allow your servers to talk to your Redis cache (when it exists).
 1. In order to find which security group you need to search for, it might be helpful to go back to the Security Groups table. Look for one with the same Name as your EB environment, and with a Security group name that contains the words “AWSEBSecurityGroup“. Copy that Security Group’s ID.
2. Create your Redis cache
- Go to the ElastiCache Dashboard
- Click on Redis in the navigation panel on the left side of the page
- Click the Create button on the table that appears
- Leave the Cluster Engine as Redis and the Location as Amazon Cloud
- Add a name and optionally a description
- For a non-production service, I would change the Node type to be something smaller and uncheck the Multi-AZ box.
- For a production service, I recommend reviewing the 5 workload characteristics to consider when sizing Redis clusters. Read more here.
- Change the security group to your cache security group that you created in the previous section
- Set everything else to your preference and click the Create button in the bottom right corner of the page
Once your cache is created, go back to the Redis table and inspect your cache. There you can find connection information to include in your server, like the Primary Endpoint field.
3. Connect your server to your Redis cache
This will vary depending on your project, but more than likely you’ll have it set up to use some environment variables to take in the Redis connection string, and then you’ll have to implement using Redis yourself. If you’re using http://socket.io , this is pretty straightforward since they’ve created an adapter for Redis on their own.
All I had to do was add the following to my server set up:
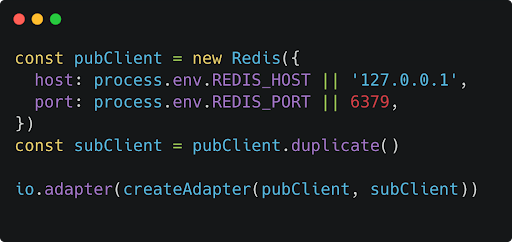
And then add the REDIS_HOST and REDIS_PORT environment variables to my Elastic Beanstalk environment’s configuration. Again, you can find these values by inspecting your cache in the ElastiCache console and looking for the Primary Endpoint property.
Configure Load Balancer for Sticky Sessions
If your service has no need for auto-scaling or multiple servers, and it can be a single node, then you can skip this step.
The last step that we need is to configure the load balancer to enable sticky sessions. This is important in multi-server deployments so that websocket connections made with a given server will continue to engage with that server for the remainder of the connection.
1. Configure Target Group in Elastic Beanstalk
- Go to the Elastic Beanstalk Console
- Click on Environments in the navigation menu on the left side of the page
- Select the environment containing your websocket application
- Select Configuration in the navigation bar on the left side of the page and scroll down to Load Balancer. Click the Edit button.
- Check the box next to the default process in the Processes section. Click Actions and then Edit.
- Under the Sessions section, check the box next to Stickiness Policy Enabled.
2. Configure Load Balancer Stickiness
- Go to the EC2 Dashboard
- Click on Load Balancers in the navigation bar on the left side of the page
- Find the load balancer related to your Elastic Beanstalk environment and check the box next to it
- In the Listeners section, select the main listener that forwards requests to your target group and click Edit
- In the main action, check the box next to Enable group-level stickiness
- Set the duration for whatever you feel is best for your project
- Click the Save Changes button at the bottom of the page
And that’s it! Your service should be completely set up to handle websocket connections and pass along events to anyone that should receive them.
Would you like us to email a copy of the documentation?
Resources
- https://medium.com/@toshvelaga/how-to-host-your-websockets-on-aws-ec2-using-nginx-e3d8629d6a38
- https://socket.io/docs/v4/reverse-proxy/
- https://socket.io/docs/v4/using-multiple-nodes/
- https://docs.aws.amazon.com/elasticloadbalancing/latest/application/sticky-sessions.html
- https://binyamin.medium.com/node-websockets-with-aws-elastic-beanstalk-elastic-load-balancer-elb-or-application-load-6a693b21415a
- https://aws.amazon.com/blogs/database/how-to-build-a-chat-application-with-amazon-elasticache-for-redis/
- https://stackoverflow.com/questions/62451799/commands-in-ebextensions-fails-on-elasticbeanstalk